
From Salesforce to Teams: Building an Escalation Agent with Copilot Studio and Power Automate

Vikram Thakur
The problem: escalations that wait for a human to notice
Most support and order-processing teams already have automation doing the heavy lifting. An agent reads incoming purchase orders, matches them against product and pricing data, and updates the CRM. When it can't finish the job (a SKU that doesn't exist, a price that doesn't match the contract, a missing ship-to address), it marks the case as Escalated and moves on.
Then the escalation sits there. Someone has to open a dashboard, notice the new status, work out why it was escalated, and post it in the team's chat. If that person is busy or on leave, the whole loop stalls. The automation is fast, but the handoff to humans is manual and slow.
We solved this by letting the system announce its own escalations, directly in Microsoft Teams, with the reason attached.
The architecture
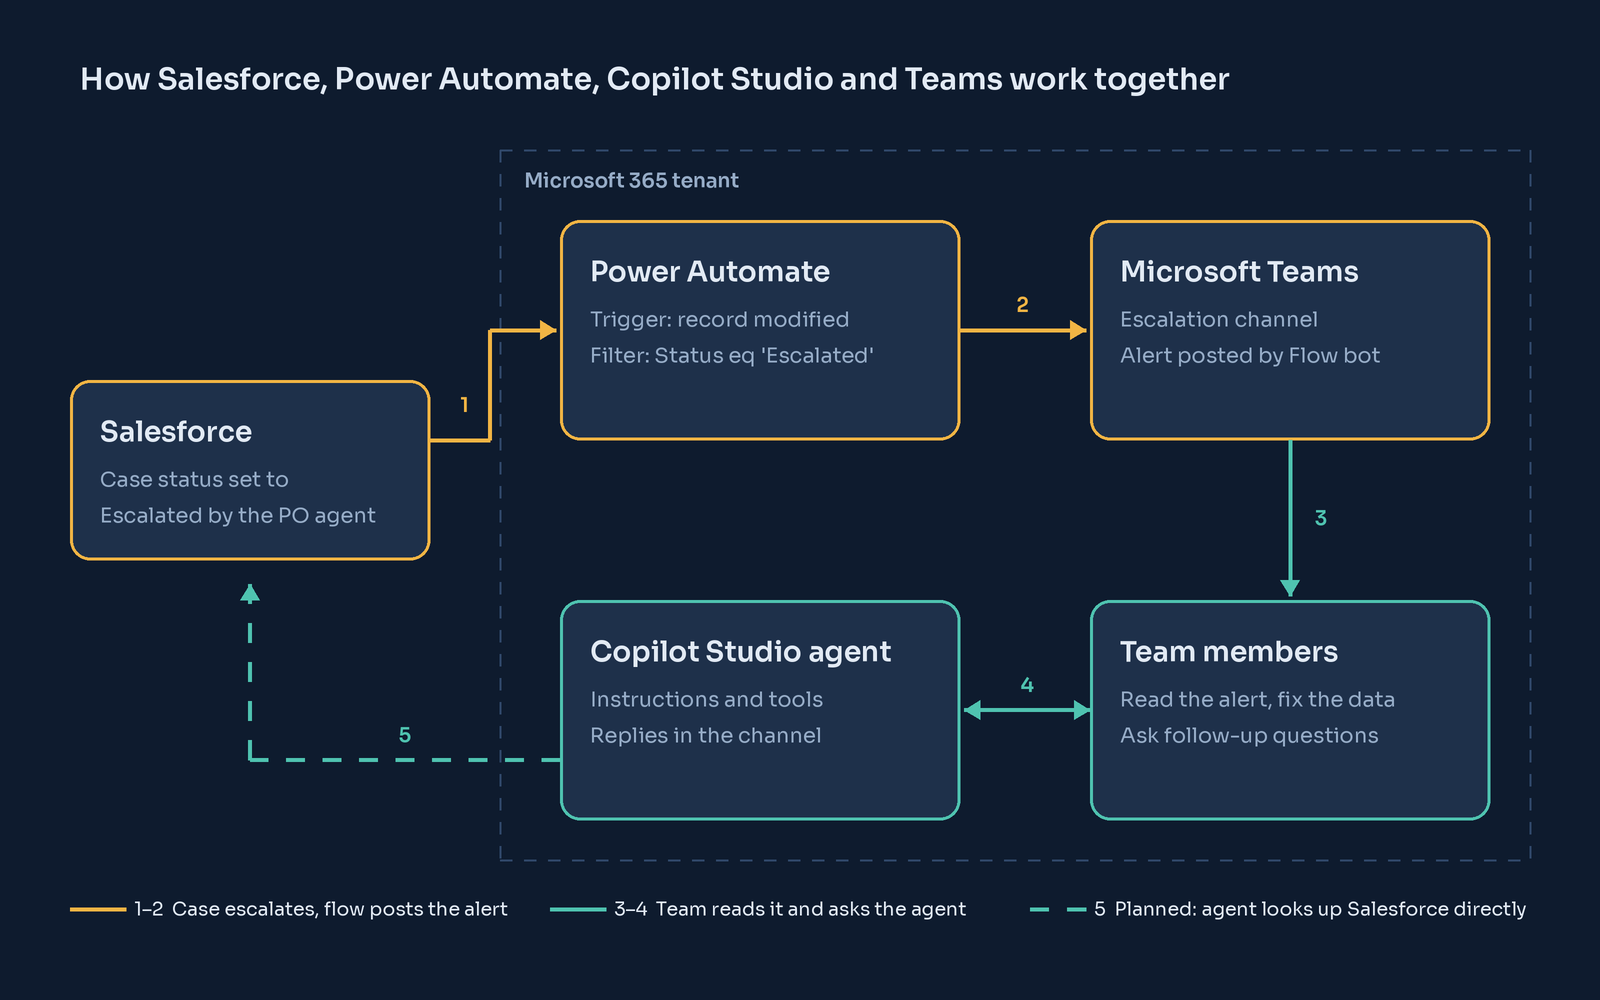
The design has two paths.
The alert path (push). A case in Salesforce changes to Escalated. Power Automate picks up the change, filters out everything else, and posts a structured alert into a dedicated Teams channel. Nobody has to check a dashboard.
The conversation path (pull). A Copilot Studio agent lives in the same channel. Team members can @mention it to ask things like "what's escalated today?" or "what does a pricing mapping error mean?". In the next phase we'll connect it directly to Salesforce so it can answer questions about specific cases.
Keeping the two paths separate is deliberate. Alerts need to be reliable and boring, so they run on a simple, deterministic flow. Conversation benefits from an LLM, so that's where the agent sits.
Step 1: Build the agent in Copilot Studio
Create a new agent in Copilot Studio in your internal environment first, not the client's production tenant. The most important part is the instructions, and a few things make the difference:
- Define the role narrowly. The agent informs, it doesn't resolve. Humans fix the underlying data.
- Specify a response format. Every escalation should look the same: case number, PO, reason, date, and a suggested next check.
- Ban guessing. The agent should only report data returned by its tools. If data is missing, it says so.
- Start read-only. No status changes and no record edits until the team trusts it.
Set authentication to Authenticate with Microsoft, which the Teams channel requires, and remove general web search so answers stay grounded in your own data.
Step 2: Publish to Teams
Publish the agent and enable the Teams + Microsoft 365 channel. In the channel details, turn on "Users can add this agent to a team" so it can join a channel rather than only living in one-to-one chats. Share it with your testers, then add it to the team where escalations will land.
Before any of this works, check with your admin that the environment has Copilot Studio licensing and capacity. A greyed-out Publish button with no error message is almost always a licensing issue, not a configuration issue.
Step 3: Wire up the alert flow in Power Automate
The flow has only two steps:
Trigger: Salesforce, When a record is modified, object type Cases, with the filter query Status eq 'Escalated'. Filtering in the trigger instead of in a separate condition step means the flow only runs when it matters.
Action: Microsoft Teams, Post message in a chat or channel, posting to your escalation channel with the case number, subject, priority, description and a direct link back to the Salesforce record.
That's the whole integration. There's no custom code and no webhook server to maintain, and it uses the same identity and governance as the rest of your Microsoft 365 tenant.
Step 4: Test end to end with realistic data
Create a handful of test cases covering both sides of the filter: some that get escalated (SKU mismatch, pricing error, missing customer data) and some that don't (new, in progress). Escalate them one at a time and confirm that alerts arrive for the right cases and that the channel stays quiet for the rest.
A few lessons from our own testing:
- The Salesforce trigger polls, so it isn't instant. Expect alerts within a few minutes, which is fine for escalations.
- "Modified" means any modification. Editing an already-escalated case fires the flow again. For production, add a "notified" flag that the flow sets after posting.
- Clicking a stage isn't saving it. In Salesforce's status path, you have to click Mark as Current Status. More than one "the flow is broken" moment turned out to be this.
What comes next
The alert path removes the manual bottleneck. The bigger opportunity is on the conversation side: giving the agent live read access to the CRM so the people resolving an escalation can ask follow-up questions in the same thread where the alert landed. After that, carefully and with human approval, the agent can start taking simple actions itself.
The pattern generalizes well beyond purchase orders. Any system that produces a status change a human needs to act on can use it, whether that's failed payments, SLA breaches or compliance flags. The recipe is the same: a deterministic flow for the alert, and an agent for the conversation.